Recently my friend bought a new laptop ,but it was stolen within few days .The good thing is that we have successfully recovered stolen laptop as i had installed a tracing software on his laptop and he had no troubles finding it.This can happen to anyone which is using the laptop or cellphone and having a tracing software installed on his laptop .
Here i am showing you a Free Laptop and cellphone tracing software called Prey.It keep track of your phone or laptop at all times , and will help you find it if it ever gets lost or stolen.And it just works

How it works
Basically you install a tiny agent in your PC or phone, which silently waits for a remote signal to wake up and work its magic.
This signal is sent either from the Internet or through an SMS message, and allows you to gather information regarding the device's location, hardware and network status, and optionally trigger specific actions on it.
Notice: This file is Trojan as detected by some antivirus, but the thing is every such files are called trojan, as the process is to Track your system and view your systems reports. But be secure, this file is not harmful for your system or for your personal information. This software is made By PRey Project Company, and they take responsibility of it.
How to Download and Install Prey
1. First of all download Prey project file from their official website.
2. After Downloading, Install the File and then
- They will ask for either standalone and +control panel.
- Go for +control panel, and than Click For New User.
- Give Your Name, Your Email and select Password to login the site.than press Ok.
- You will get Email from prey project, just activate your account there, and click your device and do the following settings:
(click to enlarge image)
 click to enlarge
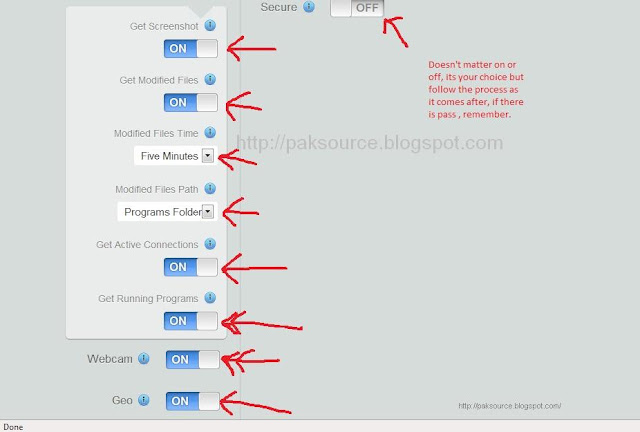 click to enlarge
If you "ON" any of the above settings than be sure to remember password of "lock pass". It will show as the time you make it on. Just below the lock it will be written pass, and when alert is on the message will display whenever you login, "this laptop is stolen ...."-lol
So these were all steps now you can install and get secure. Now if its get stolen than you can track back .
Do you have questions, comments, or suggestions? Feel free to post a comment!


 + E = Opens "My Computer" and gives me access to all my drives.


